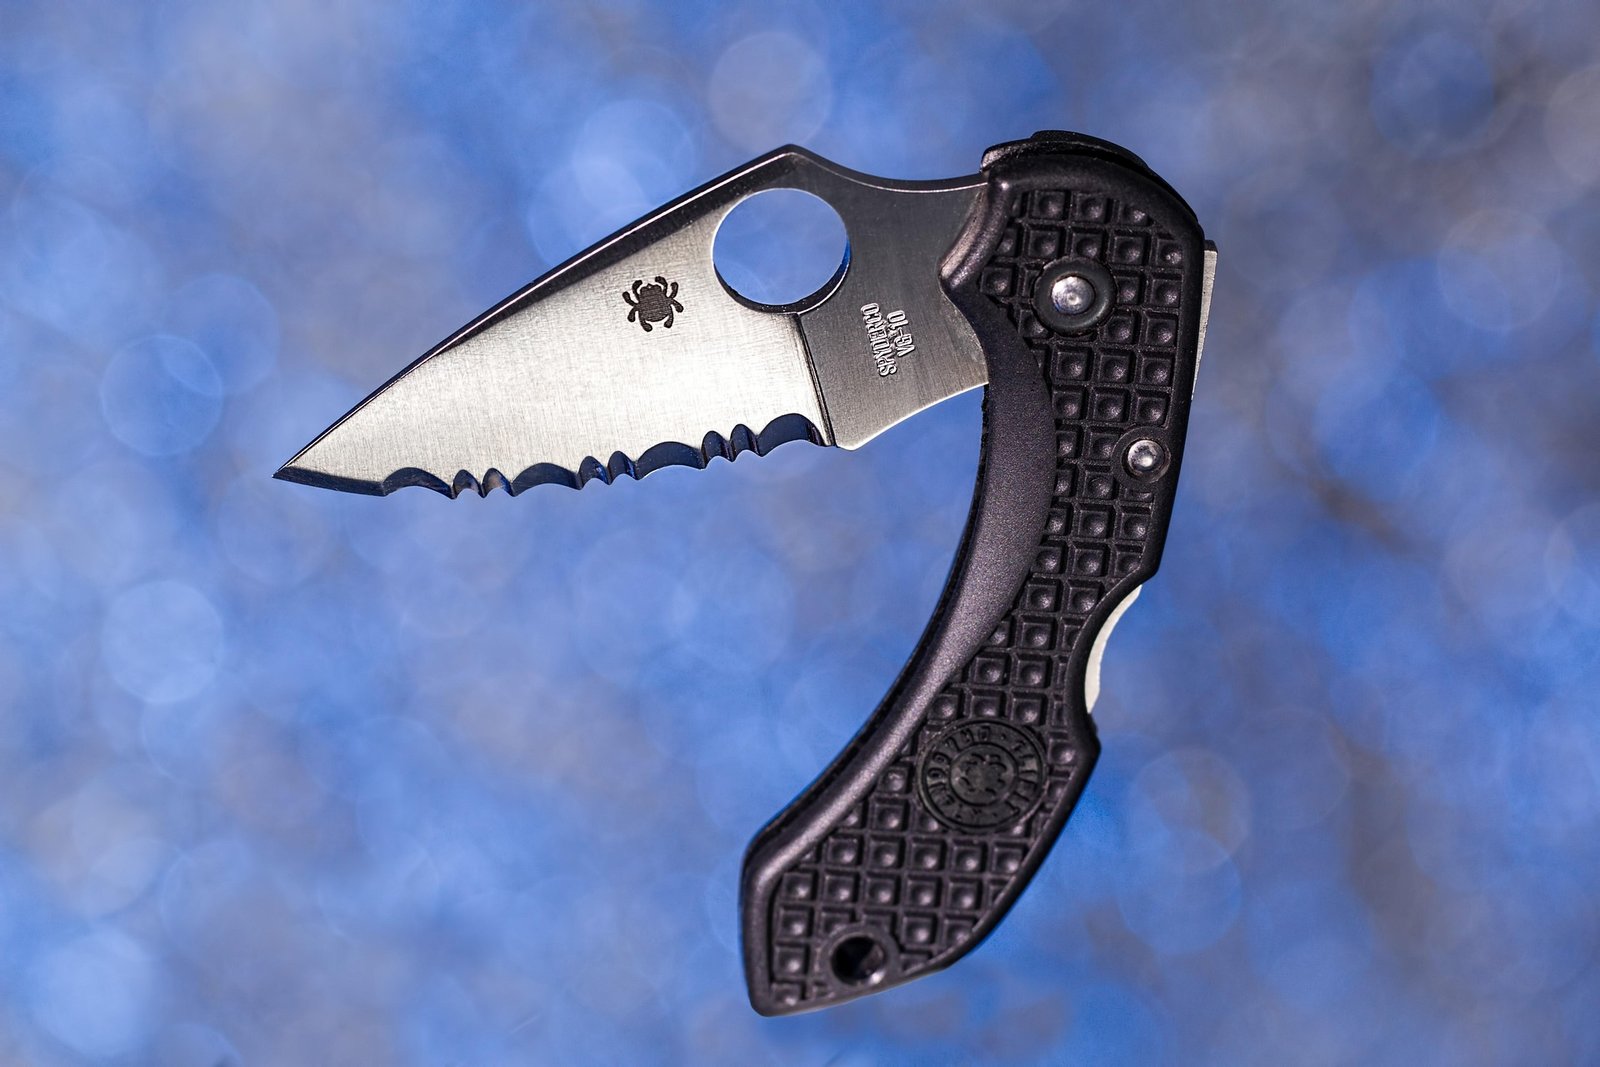
Keep the teeth — restore the bite without changing the blade's profile.
A favorite pocket knife that no longer slices rope or tomatoes while every tooth still looks intact is a particular kind of frustration. The stakes are practical and emotional: losing the original tooth geometry to aggressive grinding can mean a permanent change in cutting feel, costly reprofiling, or a one-way trip to a professional.
A low-risk, tooth-preserving approach uses a small tapered ceramic or fine diamond rod worked inside each gullet with gentle, controlled strokes. The goal is to re-establish the cutting bevels without shaving the tooth peaks—light pressure, matching the existing bevel, and frequent inspection prevent over‑removal and preserve the maker’s profile.
- Tapered rod diameter: ~1.5–3 mm to fit typical gullets
- Target bevel angle: roughly 15–20° from the face (match the existing bevel)
- Work per gullet: 4–10 light passes, inspect and test frequently
Understanding Serration Anatomy
- Scallop / gullet
The hollow curve cut between teeth visible on the blade edge; identify it by the crescent-shaped void when viewed edge-on. Preserve the original scallop radius and depth—do not file it rounder or flatter, since that defines cutting bite.
- Tooth face
The angled surface that forms each tooth’s primary cutting bevel, usually sloping toward the scallop. Maintain the face angle during sharpening; removing metal here changes cutting geometry and reduces bite.
- Land (ridge)
The small flat or slightly rounded ridge at the tip of a tooth where the two faces meet and form the cutting line. Preserve the land’s width and orientation—overgrinding will blunt the crest or alter serration spacing.
- Micro‑bevel
A tiny secondary bevel at the very edge or on the tooth face created for durability or final keenness. It can be refreshed lightly, but keep it narrow and at the same angle to avoid reshaping the primary face.
- Preservation priorities
First preserve scallop shape and tooth spacing, then maintain primary face angles and land width; only remove burrs or feather micro‑bevels to restore bite without reshaping teeth.
Choosing the right sharpening kit
- Tapered diamond rods (core tool)
Select small-diameter tapered diamond rods that match the serration gullet. Rods about 2–4 mm at the tip with a smooth taper reach each scallop without forcing a flat bevel; continuous fine/coarse diamond coating gives predictable cutting action and long life.
Look forSlim tapered diamond rods with uniform coatingAvoidThick, blunt rods that can't enter gullets - Grit progression and how it matters
Work from coarser to finer grits: a coarse (≈400–600) or coarse-coated rod restores bite, a medium (≈1000) refines the edge, and a fine ceramic or 3000+ finish polishes the micro‑bevel. Progression minimizes metal removal, preserves tooth geometry, and prevents a wire‑edge or over‑rounded teeth.
Look forKits offering coarse→medium→fine grit stepsAvoidSingle‑grit approaches that force one pass to do everything - Ceramic finishers and finger stones
Include small ceramic rods or finger stones to access tooth faces, lands, and tight gullets after diamond work. Finger stones allow controlled pressure on individual teeth for blending without changing the scallop contour.
Look forSmall ceramic rods and slip‑resistant finger stonesAvoidOversized or brittle stones that can chip in small spaces - Handle comfort, strop, and tool choice limits
Ergonomic handles and a secure grip reduce slippage during delicate strokes; finish with a leather strop charged with fine compound to remove burrs and polish micro‑bevels. Avoid carbide pull‑through sharpeners — they reshape or remove serration teeth and destroy the original gullet geometry.
Look forComfortable grips and a leather strop for final polishAvoidCarbide pull‑throughs and slippery, uncontrolled tools
Tooth‑by‑tooth sharpening sequence
- Stabilize the blade
Secure the knife so a single hand can manipulate the rod precisely. Use a padded bench vise, a dedicated sharpening clamp, or a non‑slip mat and steady hand—avoid any lateral play that would change the angle during a stroke.
- Choose and check the rod size
Select a tapered diamond or ceramic rod whose diameter seats firmly in each gullet without rocking. The rod should fill the scallop enough to contact the tooth face across the intended bevel but still slide freely along the curve.
- Align to the original bevel
Match the rod to the existing micro‑bevel: lay the rod in the gullet and change the wrist until the rod tracks flush with the tooth face. Maintain that orientation throughout sharpening so the original geometry and scallop shape are preserved.
- Execute counted, consistent strokes
With light pressure, sweep the rod from the root of the gullet toward the tooth tip, following the scallop profile. Use a repeatable count (for example, 6–10 light passes per tooth on the coarse rod), then repeat the same number for every tooth to keep geometry symmetrical; check for a tiny burr on the opposite face after each tooth group.
- Progress grits and finish
After coarse passes remove visible damage, move to a medium grit and repeat the same stroke count to refine the bevel, then finish with a fine ceramic rod or finger stone using fewer passes (2–4) to polish. Finalize with a leather strop across the flat lands and coast the bevels to remove any wire edge.
If a burr cannot be felt visually, increase strokes incrementally rather than changing angle—preserve the original scallop curvature.
Checklist for repeatability:
Stabilize: no blade movement during strokes. Rod fit: rod fills gullet without binding. Angle: match original micro‑bevel and keep it constant. Pressure: light — just enough to remove the wire edge. Stroke count: same number of passes per tooth; record counts. Grit progression: coarse → medium → fine → strop.Keeping these points consistent preserves the original serration geometry and prevents over‑reshaping.
Finishing: burr, tests, micro‑bevel, and care
Detecting and removing the burr
After sharpening, a thin burr typically forms on the opposite face.
To sharpen serrated pocket knife, look for the burr with strong light and a loupe.
Or gently check with a fingernail dragged across the bevel at a very low angle.
Remove the burr with alternating light strokes on a leather or canvas strop.
Or use a fine ceramic finger stone.
Pull the edge away from the cutting direction, one pass per side, until no burr is felt.
Avoid heavy flattening strokes that would change scallop geometry.
Testing edge quality and adding a micro-bevel
Use simple, repeatable tests to sharpen serrated pocket knife performance. Cut thin paper for keen bite. Cut a braided rope for real‑world fibers. Skin a ripe tomato to show edge behavior. Repeat tests across different serrations to compare results. Record findings to guide sharpening.
If the edge is keen but chips under load, consider a tiny micro-bevel. Create it with 3–6 very light strokes per tooth. Use a fine stone or strop, and keep the rod angle slightly raised. Finish with a polish to verify a uniform micro-bevel.
Clean and protect
Remove abrasive residue with warm soapy water or isopropyl wipe, dry thoroughly, and apply a thin film of mineral oil or corrosion inhibitor to flat areas and scallop lands. Wipe off excess to avoid gumming scallops. Lubricate the pivot lightly and store the knife dry.
When feeling for a burr, use a loupe or a very gentle fingernail check—direct thumb drag across the edge risks injury.
Common serrated sharpening myths — corrected
Preserve original tooth geometry; sharpen the existing gullets and faces instead of removing teeth.
Serrations cut by each tooth; removing them reduces bite and weakens the edge.
Avoid carbide for serrations; they grind aggressively and round scallops.
Carbide removes metal indiscriminately, destroying the fine bevels between teeth.
Match the rod to each tooth’s bevel — small teeth need shallower, larger teeth steeper.
Serration sizes vary; a wrong angle creates rounded scallops or inconsistent bite.
Check for abrasive buildup and burr before escalating grit; cleaning or deburring often restores performance.
Residue and a retained burr can mimic dullness despite a sharp bevel.
Rounded scallops: stop aggressive strokes; use a smaller‑diameter, fine‑grit rod and make light, centered passes to re‑define scallop walls.
Abrasive buildup: clean gullets with solvent and a soft brush, then strop with a loaded compound to restore bite.
Over‑filing signs: if geometry is lost, switch to finer grits, restore a tiny micro‑bevel, and avoid further material removal.
Verify with light against the edge and a gentle paper test; small fixes are reversible, major re‑profiling is not.
When tooth‑preserving sharpening is no longer appropriate
Stop-preserving decision rules
Preserve teeth only while the original scallop geometry can be restored with light, localized material removal. Consider re-profile or professional repair when any of the following apply:
- Chips: a scallop loses >30% of its tooth height or has a fractured tip that changes the bevel profile.
- Extent: more than 20–25% of teeth are visibly crushed, missing, or irreversibly rounded.
- Metal removal needed: restoring the edge requires >0.5 mm uniform stock removal across scallops.
Options tied to thresholds:
- Minor damage (single teeth or ≤20%): targeted rod repair, micro‑beveling, and stropping.
- Moderate damage (20–40% or multiple chips ≤30%): selective re-profiling with a fine belt, file, or jig to recreate scallops; expect some tooth loss.
- Severe damage (>40% or >0.5 mm removal): full re-profile or professional service; blade replacement if heat‑treat or coatings restrict grinding.
Professional services can reprofil with jigs, belt grinders, or custom machining when manual repair would destroy geometry.
They can sharpen serrated pocket knife edges when needed.
Quick checklist
-
Inspect teeth
Check for burrs, rounded scallops, or abrasive buildup.
-
Light touch‑ups
After a few uses, give one light pass per tooth with the matching rod.
-
Full resharpen
When several teeth lose bite, perform the full tooth‑by‑tooth sequence.
-
Clean & store
Brush filings away, apply light oil, strop, and sheath the blade.
Stabilize the blade (vice or non‑slip pad).
Cut away from body and keep fingers clear.
Consider a cut‑resistant glove for the hold hand.
Work slowly; one controlled stroke beats rushed motions.
Frequently Asked Questions
What tool is best for sharpening a serrated pocket knife?
A tapered diamond or ceramic rod is the recommended tool. Select one whose diameter fits snugly in each gullet without rocking — typically 1.5–4 mm at the tip — so it contacts the tooth face across the intended bevel while still sliding freely along the scallop.
Can I use a carbide pull-through sharpener on a serrated knife?
No. Carbide pull-through sharpeners grind aggressively and indiscriminately, which rounds the scallops and destroys the fine bevels between teeth. They should be avoided entirely for serrated edges.
How many strokes per tooth should I use?
A repeatable count of 6–10 light passes per tooth on the coarse rod is a good starting point. Use the same count for every tooth to keep geometry symmetrical, then repeat with fewer passes (2–4) on each finer grit.
How do I know when each tooth is sharp enough?
After completing the stroke count for a tooth group, check for a tiny burr on the opposite face by holding the blade under strong light or gently dragging a fingernail across the bevel at a very low angle. A burr indicates material has been removed and sharpening on that tooth is sufficient.
What is the correct grit progression for sharpening serrated blades?
Start with a coarse rod (approximately 400–600 grit) to restore bite and remove visible damage, progress to a medium rod (approximately 1000 grit) to refine the bevel, then finish with a fine ceramic rod or finger stone (3000 grit or finer). Complete the process with a leather strop to remove the wire edge and polish the micro-bevel.
Maintenance cadence & takeaways
- Frequent light touch‑ups keep teeth true; full sessions only when geometry is lost.
- Pair maintenance with a stable setup, careful strokes, and secure storage.
Adopt light touch‑ups after a few uses and schedule full sharpening when needed; prioritize a stable grip, controlled strokes, and finger protection.