
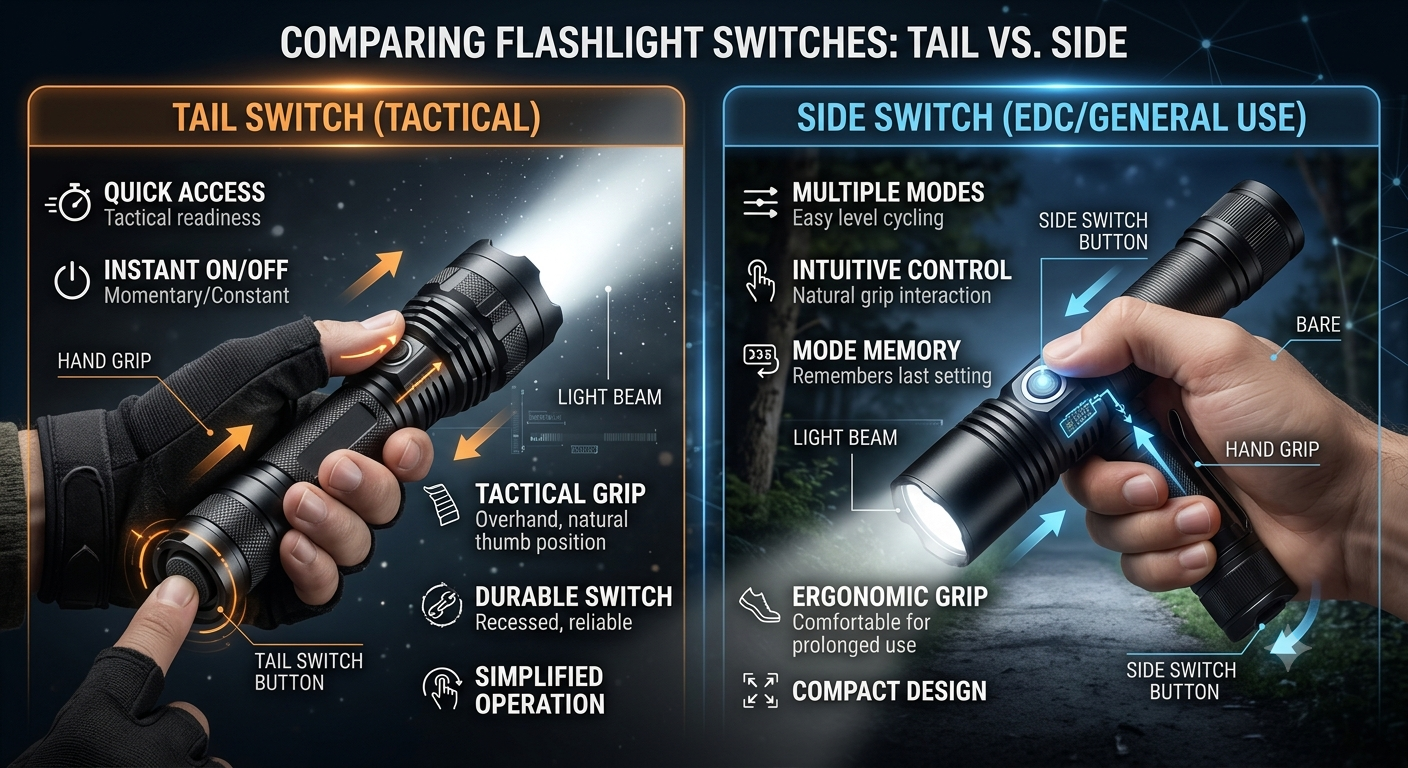
Match the switch to the draw path and holster position — a wrong choice slows response and ruins aim.
Hand already on the holster: the path the thumb or index finger naturally follows determines which switch will be quickest. Tail switches sit at the rear and align with a high, thumb-forward grip, so they tend to be fastest for one‑handed draws where the thumb can travel straight back. That same placement can be blocked by holster mouths or clothing and is more prone to accidental presses if the grip rides high.
Side switches are mounted on the slide/frame and are easier to reach during cross‑draws, two‑handed presentations, or when using the support hand. They often allow ambidextrous mounting and sit further from the holster mouth, reducing interference. Prioritize holster geometry and the natural draw path; verify with a loaded gun, full kit and repeated dry‑fires rather than marketing claims.
Tail and side switches: concise definitions
Core definitions and variants
A tail switch sits on the flashlight’s tailcap. Physical forms include a raised or recessed push‑button, rubber boot, or clicky cap. Typical hand position: the thumb rests on the tail during a one‑handed, thumb‑forward draw, leaving the index and middle fingers on the body.
A side switch is mounted on the head or body tube. Forms range from small recessed clickers to large paddles or rings. Typical hand position: the index finger (or thumb, in some grips) activates the control while the hand stabilizes the light — useful for two‑handed holds and cross‑draws.
Common variants and hybrids:
- momentary vs constant‑on switches
- forward vs reverse clickers
- dual‑switch designs (tail + side) and ring or paddle hybrids
For context about intended use and carry styles, see what is a tactical flashlight.
Mental model: think of tail as thumb-first, lightning‑fast activation, side as index‑driven, versatile grip control; hybrids aim to combine both advantages.
Mechanical vs electronic switches
How each mechanism works
Mechanical switches close a circuit by bringing physical conductors into contact. A plunger or lever compresses a spring, metal contacts touch, and current flows. The action produces tactile feedback and often an audible click. Over many cycles contacts wear, can pit from arcing, or accumulate oxidation, which raises resistance.
Electronic switches use sensors—Hall-effect magnets, capacitive pads, optical interrupters, or solid‑state transistors—to detect position without metal‑to‑metal contact. Detection is interpreted by simple electronics or firmware to switch power. Because no contact is required, the device can be fully sealed behind a membrane.
Why mechanism choice changes performance
- Feel: Mechanical offers distinct, immediate tactile cues; electronic can emulate a click but often feels softer and more consistent. Programmable haptics can approximate mechanical sensation but add complexity.
- Latency: Mechanical closure is effectively instantaneous but can suffer from contact bounce; electronics introduce sampling and debounce delays, though well‑designed systems keep latency in the sub‑millisecond to low‑millisecond range.
- Reliability & failure modes: Mechanical failures are mechanical (broken springs, stuck plungers, contact corrosion). Electronic failures include sensor drift, firmware faults, power loss, or PCB corrosion.
- Ingress sealing: Electronic sensors enable hermetic sealing or membrane interfaces; mechanical switches require gaskets, boots, or sacrificial interfaces to prevent contamination.
Trade-offs center on preferred tactile feedback and serviceability versus sealing, programmability, and predictable electronic behavior.
How switch behavior and electronics interact
Momentary versus latching
Momentary switches route power only while pressed; latching switches toggle state on actuation. Momentary is ideal for short signals or momentary bursts of high output because it prevents prolonged thermal loading. Latching suits tasks that require sustained illumination without continuous finger pressure.
Mode memory and accidental activation
Mode memory (stored last-mode) changes user expectations: a remembered high-power mode can drain the battery if accidentally engaged. Also consider switches and battery compatibility when choosing memory behaviors, since battery chemistry and protection circuitry interact with mode dwell.
Lockouts and accidental-activation strategies
Common strategies:
- Mechanical guards: raised bezels or recessed buttons to prevent pocket activation.
- Software locks: long-press to enable, double-tap for special modes, or timed lockout after inactivity.
- Combination methods: require two-step sequences for strobe or turbo to reduce accidental use.
Battery drain and thermal behavior
Access method affects runtime and heat: momentary access to a high mode yields short, high-power bursts with minimal thermal accumulation; latching a high mode produces continuous heat and often causes automatic thermal step-down. Memory that restores a previously high mode can lead to surprise heating if no lockout exists.
Practical pairings:
- Momentary for signaling, quick inspections, and tactical blips.
- Latching without memory for workshop or camp use.
- Latching with lockout for carry or transport to avoid accidental turbo activation.
Tip: Use momentary activation to avoid sustained thermal stress; prefer latching plus a lockout when continuous light is needed for long tasks.
How grip and transitions change aiming and stability
Aiming stability is the product of contact geometry, muscle activation, and the kinematic chain from shoulder to fingertip. Switch placement changes that chain: the location of the control relative to primary contact points alters lever arms and which muscles are recruited during transition, producing measurable micro‑motions at the muzzle.
Grip dynamics and transition path
- Tail switch: often engaged by the thumb during a thumb‑forward or isosceles grip. Thumb extension produces a short, axial force near existing contact points, minimizing wrist torque and preserving trigger‑finger alignment. Because the thumb already bears stabilising pressure, actuation tends to produce smaller angular disturbances.
- Side switch: commonly actuated by the index/middle finger or a re‑gripped thumb. Finger flexion or lateral reach introduces transverse forces and small pronation/supination moments. Those forces couple to the trigger finger and can create lateral drift during the actuation window.
Hand size and gloves matter: larger hands or thick gloves increase required reach and excursion, which raises forearm and intrinsic hand muscle recruitment and therefore physiological tremor. Glove material reduces tactile feedback, often causing higher applied force and overcompensation.
Mounting and weapon geometry also influence outcome. A control placed farther from the longitudinal axis increases torque for the same finger force; on lightweight platforms this amplifies disturbance. Electronic sensors with low actuation force reduce gross movement but can increase accidental inputs if placed where incidental pressure occurs.
Switch reach, pressure, and tradeoffs
- Reach: longer reach → more muscle recruitment → slower, larger disturbances.
- Actuation force: lower force → less movement but higher false‑positive risk.
- Travel: short travel → faster transitions; longer travel → better proprioceptive feedback.
These variables interact; matching switch ergonomics to typical grip and draw path reduces aiming disruption and improves transition speed—see how control layout affects aiming for broader context.
Match scenario to switch layout
Match scenarios to switch layouts
- Everyday carry (EDC): A tail switch favors single‑handed, thumb‑forward draws and fast momentary activation when carried tip‑up. It preserves natural grip ergonomics for many users. The side switch is sensible when ambidexterity, pocket orientation variability, or clipped carried positions demand easier lateral access.
- Tactical / law enforcement: A tail switch often enables rapid one‑handed activation during weapon‑style manipulations and close‑quarters control, especially with gloves. A side switch can be preferable for controlled, indexed activations and when transitions between hands are frequent; it also reduces accidental activation during prone or low‑profile stances.
- Search and rescue (SAR) / first responders: A side switch typically wins for glove use, harnessed carry, and variable hand positions because it’s easier to find by feel. Choose a tail switch when headlamps or helmet mounts make reachability from the butt end more reliable.
- Running, biking, and endurance sports: A low‑profile side switch reduces snag risk and is easier to actuate from varied hand positions on bars or trekking poles. A tail switch can work for chest‑or waist‑mounted carry if draw mechanics are consistent and accidental activation is mitigated.
- Household and trades: A side switch provides predictable on/off control for repetitive tasks and ladder work; tactile location helps with one‑handed tool handling. A tail switch may be preferred for quick, momentary signaling or when the tool is used in a pistol‑style grip.
Quick selection checklist:
- Prioritize the dominant draw path and typical hand posture.
- Match switch type to common carry/mount orientation.
- Consider glove use, accidental‑activation risk, and whether momentary vs latching operation is needed.
Accessibility, Retrofits, and Remote Controls
How does handedness affect switch choice?
Tail switches are often optimized for a dominant‑hand, thumb‑forward draw while side switches and mirrored side layouts accommodate left‑ or right‑hand use. Some tail designs are reversible, but ergonomics may still favor one side.
Do gloves affect switch performance?
Thick gloves change reach and reduce tactile feedback—choose larger pads, longer throw, or higher‑force mechanical switches to avoid accidental activation. Electronic capacitive sensors may fail with gloves unless designed for gloved operation.
What about remote pressure switches and routing?
Remote pressure pads provide flexible placement (grip, forearm, belt) but introduce cable routing, connectors, and ingress points that require strain relief and sealing. They can add negligible latency but increase inspection and potential failure locations.
Are true ambidextrous solutions available?
Yes—mirrored side switches, reversible tails, dual‑button layouts, and programmable sensor mapping offer genuine ambidexterity. Empirically testing ergonomics under intended draw and carry positions is essential.
What are the maintenance and reliability implications?
Auxiliary controls increase components: connectors, cables, seals, and firmware—each adds a maintenance task and potential failure mode. Regular inspection of seals, connector integrity, strain relief, and battery/firmware status reduces risk.
Tactical checklist — prioritize everyday pocket carry
- Primary carry & draw (most common use-case)For everyday pocket carry with a thumb-forward one-handed draw, choose a layout that places the switch on the tail and aligns with the natural thumb path to minimize re-grip and activation time.Look forTail switch aligned to thumb, short positive throwAvoidSide-only layouts that force a re-grip on draw
- Mode access and accidental activationMode spacing, momentary vs latching behavior, and a reliable lockout reduce accidental-on risk while preserving rapid tactical access when needed.Look forDistinct mode order, momentary option, proven lockoutAvoidSingle ambiguous button without lock or clear mode sequence
- Ambidexterity and gloved operationIf off‑hand use, cross‑draw, or gloves are common, favor larger side paddles, symmetric controls, or remote/pressure-plate options that preserve reach and tactile feedback.Look forLarge accessible paddle or remote-compatible controlAvoidTiny recessed switches unusable with gloves
- Durability, sealing, and serviceabilitySwitch type (mechanical vs electronic), seal quality, and the availability of replacement modules determine long-term reliability and ease of repair.Look forProven sealed design, replaceable switch module, corrosion-resistant partsAvoidUnserviceable sealed switches with unknown failure history
Quick field-test checklist
-
Assume the fight grip
Hold the firearm as for a real draw and bring to cheek; note whether the thumb or finger naturally rests on the switch without altering the sight picture.
-
Press under tension
Apply normal gripping pressure and actuate the switch to feel travel, force, and whether activation causes any hand movement.
-
Dry-draw timing
Perform controlled dry draws and activate at presentation to confirm consistent timing and no grip re‑set is needed.
-
Test variants
Repeat with gloves, the support hand, and with typical clothing/holster to expose access or accidental‑activation issues.
-
Mode and holster check
Cycle modes and simulate holstering to verify lockouts and that incidental contact won’t cause unwanted activation.
Rule-of-thumb & next step
- Prefer layouts reachable without shifting the sight picture.
- Favor minimal activation movement and clear tactile feedback.
- Validate under real-wear conditions (gloves, weak hand, holster).
Rule‑of‑thumb: choose the switch that can be reliably actuated from the primary grip without altering the sight picture or requiring a grip reset.
Next step: run the checklist with usual carry kit and a few timed dry-fire repetitions; the layout that yields fastest, consistent actuation under those conditions is the practical choice.






9 Comments
Skeptical about the checklist favoring tail-switch for everyday pocket carry — seems like it assumes a particular pocket carry orientation. What if you appendix carry or use a hip holster?
Quick follow: when they talk about lockouts and mode access affecting battery/heat, is that mainly with high-output electronic setups? I’m thinking about sustained use during sports or long events.
Also, any tips for testing heat buildup in the field without specialized gear?
Yes, high-output electronics are the main culprit. For heat testing, do repeated on-off cycles on a warm day and feel the head temperature (careful!). Or run at high output for a few minutes and check if the device throttles or changes mode.
Correct — high-output modes, long latching periods, and poor thermal designs increase heat and drain batteries faster. Field tip: use an IR thermometer if you have one, or the glove test Mark suggested (touch with a gloved hand at intervals). Also monitor for automatic dimming or thermal shutdown behaviors described in the manual.
Good article. The rule of ‘reach without changing sight picture’ should be the headline.
For people who need ambidexterity but prefer tail-switch feel, has anyone tried remote cables to place the switch on either side? The ‘Accessibility, Retrofits, and Remote Controls’ section hinted at this but I didn’t see pros/cons listed.
Remotes are a solid compromise. Pros: let you keep a preferred head-mounted switch while offering alternate switch placement, support for gloves, and ambidextrous setups. Cons: extra failure points (connector wear), potential latency depending on wiring, and slightly more complexity in maintenance. They also change ergonomics — test the routing so the cable doesn’t snag during draw.
Nice breakdown. So tail switch is basically the go-to for a quick one-handed draw from a pocket, right? Short and sweet.
I tried switching from a tail to side switch on my carry setup to be more ambidextrous. The article’s point about grip geometry is spot on.
I found my micro‑movements got worse until I adjusted my hold and reduced actuation force. Curious if anyone else had to retrain their draw to regain accuracy?