

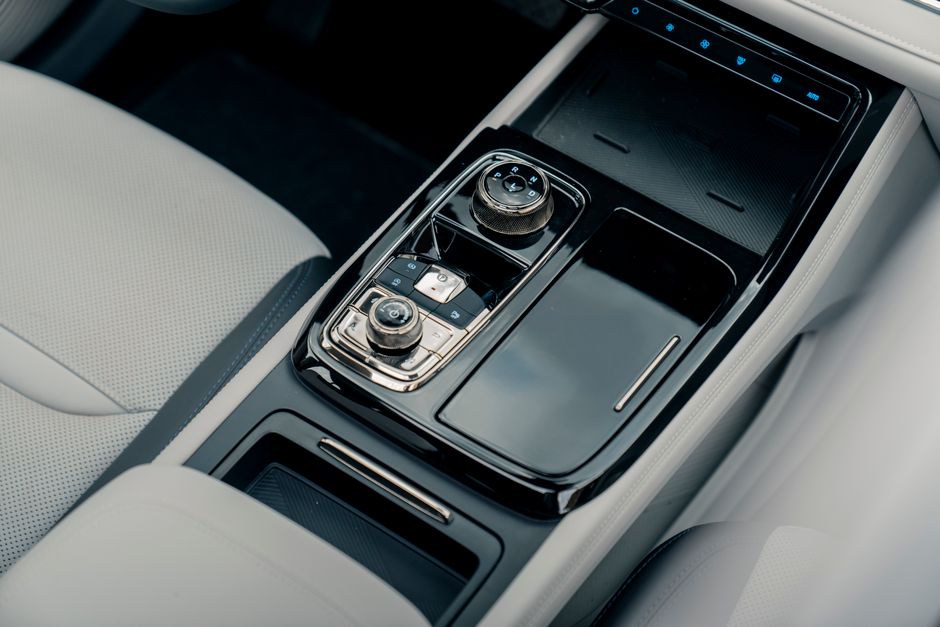
A center console earns its keep when every item can be found by touch, not by a search.
At a red light, a loose charging cable catches a pen; receipts slide under a sunglasses case; the parking pass needed now has disappeared beneath both. What was meant to be a convenience space becomes a small but persistent source of visual noise and divided attention.
The useful target is not an empty console or an elaborate storage system. It is a deliberately limited reach zone: a place for the few objects routinely needed during a drive or at its beginning and end. Anything that requires digging, sorting, or reading labels while stopped has already exceeded the console’s practical role. Calm comes from reducing the item count, assigning stable positions, and leaving enough open space for a hand to retrieve one object without disturbing the rest.
- Common console essentials: registration documents, a compact charging cable, sunglasses, a small cleaning cloth, and a vehicle-specific adapter if regularly used.
- A useful test: if an item has not been used during the past month or is needed only outside the vehicle, it often belongs elsewhere.
Give each item a reason to be within reach
A center console is not spare storage. Instead, view it as a driver-adjacent access zone. Each item there competes for attention and can distract you when found while the vehicle moves.
To organize center console effectively, keep only the items you use during trips. Limit clutter and store other essentials in dedicated pockets or cups. That approach reduces distraction and helps you stay focused on the road.
First, apply a three-part test before assigning anything a place. Additionally, this helps you organize center console items efficiently.
- Frequency: Is it used on most trips or at least several times a week?
- Urgency: Could it be needed promptly during a routine stop, such as a parking pass or charging cable?
- Safe retrieval: Can it be identified and removed by feel or with a single glance while parked?
Items that meet two or three tests earn a fixed slot.
Typical candidates include a vehicle-specific cable, a small pack of tissues.
Additionally, these include a toll device if not mounted elsewhere, and a compact cleaning cloth.
Items used only occasionally—spare sunglasses, receipts, manuals, gift cards, and loose change—belong in another storage area.
Do not treat “might need it” as urgent. Additionally, it often causes unnecessary haste.
A roadside kit may be important, for example, but it is usually safer in the trunk or cargo compartment than loose beside the driver.
Empty it before assigning a place
-
Remove everything, including hidden debris
Lift out trays, liners, cable ends, coins, and anything wedged below the hinge line. Vacuum grit from seams, wipe hard surfaces, and let the compartment dry fully before reinstalling inserts.
-
Map the usable volume
Note the lid’s swing path, shallow front areas, deep rear pockets, USB or 12-volt ports, and any space blocked when a seat moves. An item that prevents the lid from closing or strains a cable does not have usable storage space.
-
Sort by destination, not by object type
Make four groups: keep in the console, relocate elsewhere in the vehicle, take indoors, and discard or recycle. Only items needed regularly while parked—or by a passenger—typically belong in the first group.
-
Apply the duplicate rule
Keep one working version of a purpose unless two people routinely need the item at the same time. Extra charging cables, pens, sunglasses cases, and loose adapters usually create more searching than convenience.
-
Remove stale and orphaned items
Discard expired coupons, old receipts, dried wipes, leaking pens, and damaged packaging. Relocate unpaired keys, mystery fasteners, obsolete adapters, and items without a defined use; if their owner or purpose cannot be named, they have not earned console space.
The reset is successful when every remaining object can answer three questions: What is it for? When is it used? Why is this location safer or faster than another? If the answer is vague, the item belongs elsewhere.
Build a reach-and-visibility hierarchy
An ideal center console works best in three access layers.
However, the goal is not to fill every compartment.
It is to make the next needed item obvious without shifting a pile aside.
Keep the top layer nearly empty
Immediate-access space is for a very small set of items used on most drives. Additionally, it is needed quickly when parked. Additionally, depending on the vehicle, that might include a charging cable in a fixed clip. It might also include a toll transponder accessory or a small parking-garage pass holder. Loose objects that slide, rattle, or obscure controls do not belong here.
Put occasional essentials under cover
For example, the lidded bin suits items that matter but are not needed while the vehicle is moving.
Additionally, a shallow tray or narrow pouch can divide this layer so small pieces remain visible at a glance.
- Place the most often retrieved covered item on top.
- Store flat items vertically or in labeled sleeves rather than stacked.
- Limit each category to one container, preventing duplicate supplies from spreading.
Relocate bulky supplies
Generally, umbrellas, large cleaning bottles, spare clothing, and tool kits usually belong in the trunk or cargo area. Additionally, multi-item emergency supplies typically belong in a dedicated seat-back organizer. If retrieving one item requires removing two others, the hierarchy has failed; console items should be reachable in one motion.
Protect the open space
- Measure the usable cavityRecord interior length, width, depth, and any taper; the opening is often smaller than the space below it. Check the dimensions with the lid fully closed, not merely at the rim.Look forA measured footprint with clearance at the narrowest point.AvoidAn insert chosen from its advertised outside dimensions alone.
- Test moving parts and portsA lid may swing inward, a cable may need a gentle bend, and a charging port may sit below the top edge. Mock up the tallest intended item before committing to an organizer.Look forUnblocked lid travel, cable routing, and easy plug access.AvoidA snug fit that pinches cords or turns closing the lid into a two-handed task.
- Use trays only for small, stable groupsA shallow tray can stop pens, adapters, or coins from migrating, but it also consumes vertical space and creates a second layer to lift. It earns its place when its contents remain visible and removable in one motion.Look forOne lift-out tray holding a defined, low-profile group.AvoidStacked trays that bury the items meant for quick retrieval.
- Choose containment that leaves a marginNarrow bins and thin liners work differently: bins create boundaries, while liners reduce rattle and protect surfaces without dividing the cavity. A small unoccupied margin allows fingers to grasp items and accommodates occasional changes.Look forSoft liners or slim bins that preserve a reachable open area.AvoidEvery inch partitioned into dedicated slots.
A console insert succeeds when it reduces searching without increasing the number of decisions. If an item needs to be lifted, shifted, or remembered by compartment before it can be used, open space may be more functional than another divider.
A simple test: load the likely contents, close the lid, connect the usual cable, then remove the most-used item without looking. Friction in any of those actions is evidence to subtract a compartment, not add one.
Give drifters a single home
The items that migrate are rarely large; they are the ones handled in a hurry.
A console stays orderly when each has one obvious landing place.
However, a series of pockets invites searching.
Choose compact, low-bulk homes
- Cable: Coil one short charging cable in a shallow tray channel or elastic loop. Leave the connector facing the access side, and remove spare cables from the console.
- Coins: Use a small lidded cup or narrow coin well. An open pile rattles, spreads, and tends to collect unrelated debris.
- Key fob: Keep it out of the console unless it is a dedicated spare; a fob needed for driving belongs in a consistent personal carry location.
- Pen: Clip a single reliable pen to a tray edge or slim sleeve so it cannot roll under other items.
- Parking items: Group a garage remote, access card, or validated ticket in one flat slot. Discard expired tickets promptly.
The console is not a cure for objects that fall beside the seat.
Additionally, a dropped phone, card, or charging lead is better managed with methods that keep items from disappearing by seat.
Keeping that problem separate avoids overfilling the console with retrieval tools, such as a fitted seat-gap organizer.
Keep driving documents slim and protected
Documents tend to fill any compartment, so the console needs a firm document boundary.
Keep only current, vehicle-specific records there to organize center console, for example registration copies where locally appropriate.
Review the documents that need to remain accessible while driving; less urgent material can live elsewhere.
Use a slim, closed sleeve rather than loose sheets. Additionally, a water-resistant envelope or narrow document wallet protects edges. It prevents pages from sliding beneath the tray and can be lifted out in one motion. Place it flat at the lowest covered layer, never around the shifter or on top of frequently used items.
Avoid turning the console into an archive.
Additionally, owner’s manuals, service invoices, old policies, receipts, and multi-page guides belong in home files.
A glove box, if suitable, or a digital record system should be used.
Replace outdated pages during routine clean-outs.
Make trash removable
Wrappers, receipts, and used tissues do not belong in the same system as items needed while driving. They are temporary by definition. Therefore, place the trash in a small removable bag, a lidded cup, or a washable silicone bin. Position it where it cannot interfere with the shifter, lid, or charging ports.
First, choose a container with a firm opening.
Additionally, avoid treating door pockets or the console cavity as a bin.
Moreover, small paper scraps migrate beneath organizers and make the whole space look neglected.
Empty the container at each fuel stop, charging session, or return home. Additionally, that trigger links disposal to an existing transition, preventing a few receipts from becoming an overflowing pile.
Test the setup before it becomes routine
- Run a parked retrieval test
With the vehicle safely parked, open the console and locate each essential by touch and sight. Any item that demands digging, lifting, or moving another object has the wrong home.
- Separate conflicting uses
Do not stack a charging cable over documents or bury a parking pass beneath loose coins. Unrelated items create small retrieval failures that invite rummaging later.
- Reset after each trip
At the end of a drive, remove trash, return drifters to their assigned place, and take out anything that belongs indoors.
- Use a one-in, one-out rule
A new console item replaces an existing one or earns space elsewhere. This boundary prevents “just in case” supplies from quietly consuming the reach zone.
Frequently Asked Questions
What items actually belong in a car's center console?
Items that pass at least two of three tests: frequency (used on most trips), urgency (needed promptly during a stop, like a parking pass or charging cable), and safe retrieval (identifiable and removable by feel or a glance while parked). Typical examples include a vehicle-specific charging cable, a small pack of tissues, a toll device, and a compact cleaning cloth.
How should I reset a cluttered console before reorganizing it?
Remove everything, including hidden debris, and clean the compartment. Map the usable volume, including the lid’s swing path, ports, and any space blocked when a seat moves. Sort items into four groups: keep in the console, relocate elsewhere in the vehicle, take indoors, or discard. Apply a duplicate rule and remove stale or unidentified items.
What are the three access layers for organizing a console?
The top layer should stay nearly empty for a very small set of items used on most drives, such as a charging cable in a fixed clip or a parking-pass holder. A lidded bin below that holds occasional essentials like documents, a pen, or a cleaning cloth. Bulky supplies such as umbrellas or tool kits should be relocated to the trunk or cargo area.
Where should important documents be kept in the console?
Only current, vehicle-specific records belong there, such as registration copies where locally appropriate, current insurance information, roadside-assistance details, and a concise incident-information card. Keep them in a slim, closed sleeve placed flat at the lowest covered layer, not as loose sheets.
How often should console trash be emptied?
Empty the trash container at each fuel stop, charging session, or return home, so disposal is linked to an existing routine rather than allowed to accumulate into an overflowing pile.
How can I tell if a console organization system is working?
Run a parked retrieval test: with the vehicle safely parked, locate each essential by touch and sight. Any item that demands digging, lifting, or moving another object has the wrong home. A one-in, one-out rule also helps prevent supplies kept “just in case” from quietly refilling the space.
Calm comes from easy retrieval, not more storage
- A small empty area is functional space, not wasted capacity.
- Items that repeatedly drift out of place usually need a different destination.
A console remains useful when every item is visible or retrievable in one simple motion. Brief parked tests and a light reset keep the system from turning back into a catchall.



3 Comments
The single home for “drifters” is the bit I needed. My parking garage fob kept migrating under the passenger seat like it had plans of its own 😅 A small shallow dish by the console fixed it, and I stopped keeping coins in the cup holder.
I’m mildly skeptical about the removable trash container. In theory it sounds tidy; in practice I can see myself faithfully carrying around one old receipt and a gum wrapper for six weeks.
That said, tying it to predictable transitions makes sense. I started clearing the console when I fill up the tank, and it has actually stuck so far. The one-in, one-out rule is also helpful for cables—there is no earthly reason I need four mystery charging cords in there.
That’s exactly why the transition matters more than the container itself. Fuel stops, arriving home, or a weekly car wash are useful reset cues because they happen without needing a separate “organize the car” task. And yes, mystery cables multiply when left unsupervised.