
A crossbody can look neatly proportioned on a product page, then feel like a pendulum by lunchtime.
The warning signs are familiar: the bag drops below the hip, bumps against the thigh on stairs, or rides high enough to crowd the ribcage. For a petite frame, those problems are rarely solved by a “petite” label alone. Torso length, shoulder slope, bust placement, bag depth, strap width, and what the bag carries all change where it settles and how much it swings.
A useful fit creates an intentional resting point—often around the upper hip or waist—without the strap cutting in or the bag tipping outward. That stability matters as much as visual scale in an everyday carry checklist for women: a compact bag can still feel unruly when its strap is too long, its hardware adds bulk, or its contents pull the base away from the body.
Choose where the bag should land
Before strap drop is measured, decide where the bag’s bottom should settle.
Additionally, for a petite crossbody bag fit, a compact bag can sit higher than a larger utility style.
The useful target keeps its load close without restricting movement.
- High rib: Just below the bust. This position keeps a light, compact bag exceptionally close and minimizes swing during walking, but can feel crowded with a structured or full bag.
- Waist: Around the natural waist. It offers quick access and good control for everyday essentials, although a wide bag may interfere with seated comfort.
- High hip: At or just above the hip crest. This is often a balanced landing zone for medium-weight bags: the hip helps steady the load while the bag remains reachable.
- Low hip: Below the hip crest. It suits relaxed styling and taller bag bodies, but creates more pendulum swing and can bump the thigh on stairs.
For a similarly close-carry alternative, belt bag fit tips for petite bodies can clarify how placement changes stability. Heavier loads generally benefit from a waist or high-hip target; light bags allow more freedom to sit at the rib or low hip.
Measure the whole carrying system
Total strap length
The end-to-end length at a stated setting, ideally including swivel clips, rings, adjusters, and fixed buckle sections.
Adjustment range
The shortest-to-longest usable span. Two straps with the same maximum can fit very differently if one has little shortening capacity.
Strap drop
The vertical distance from shoulder to bag top when worn. It describes a silhouette, not the strap’s actual end-to-end length.
Body length
The bag’s height. A longer body reaches lower even when its strap and attachment points match another model.
Bag depth
Front-to-back projection. More depth pushes the bag outward, changing where it sits and how far its base extends.
Brand charts often report only visible webbing, while the worn path also includes hardware and buckle tails. Compare each model at its shortest and longest functional setting, then add bag body length and depth before judging its landing point. This matters especially with compact bags designed around narrow water bottles for shallow purses: a deeper-than-expected load can make an apparently correct strap wear lower and farther from the torso.
Measure the diagonal path in real wearing conditions
-
Dress for the conditions the bag will meet
Put on the layer most often worn with the bag—perhaps a knit, blazer, or light coat—and stand naturally. A bare-shoulder measurement can be misleading because clothing adds bulk and changes how smoothly a strap slides into position.
-
Mark the shoulder and landing points
Identify the point where the strap will rest near the top of the shoulder, then mark the intended bag position at the waist or upper hip. The useful line runs diagonally across the torso between those two points, rather than vertically from shoulder to hip.
-
Trace that line with a tape or string
Drape a flexible tape measure or non-stretch string over the chosen shoulder, across the chest, and down to the landing point. Keep it following the body without pulling tight; add the bag’s attachment path if the strap connects below its top edge rather than at the corners.
-
Build in usable movement
Hold the tape or string at the measured length, then reach forward, bend slightly, and lift the opposite arm as during a normal day. The line should not bind at the neck or pull the bag unusually high. A small amount of ease is more realistic than a perfectly taut mirror measurement.
-
Check the same setting while seated
Sit in a chair with the simulated strap still in place. The bag should remain accessible without riding into the ribs or throat, and the strap should not become sharply taut across the torso. If seated posture changes the result, record both measurements and favor the longer functional setting.
-
Translate the result to an adjustable strap
Measure an existing comfortable crossbody strap from attachment point to attachment point, or use the string as a reference against a candidate strap’s full adjustment range. Note the specific hole or slider position that works, since the midpoint of a listed range may not match the required setting.
For a repeatable record, write down the clothing layer, bag depth, and seated result alongside the diagonal measurement.
Match the measurement to the adjustment range
Additionally, a petite crossbody bag fit depends on comparing your diagonal measurement with the bag’s strap range.
The measured setting should sit inside that range, not at either stop.
That leaves shorter settings for light clothing and longer ones for a coat, blazer, or knit.
As a practical check, identify the strap setting that places the bag in its chosen landing zone over the bulkiest layer likely to be worn. The bag should still shorten enough for a thin top without rising uncomfortably high. A range that merely reaches the measured number can work on paper yet offer no seasonal flexibility.
Account for the bag’s physical dimensions
Listed strap length is not the whole carrying geometry. Depth holds the bag away from the torso, effectively lengthening the path needed to keep its center at the same height. A taller bag may reach the hip even when its top edge sits high, while a wide bag can extend across the body and swing more as it moves away from the torso’s centerline. These details matter in sizing totes and crossbody bags as well, although a tote’s handles create a different fit problem.
Crossbody carry uses the full diagonal route from shoulder to opposite-side landing point. Shoulder carry uses a much shorter, more vertical path and is more sensitive to handle drop and underarm clearance. A convertible bag therefore needs enough adjustment for each mode; one setting rarely serves both well.
Some brands state the full strap length, while others list the drop or only the adjustable segment. Compare like with like before ruling a bag in or out.
Read the fit in motion
A measured setting is only a starting point. Two people of the same height can need markedly different placements because the diagonal crosses different torso lengths and curves. On a short-waisted frame, a bag set high may crowd the ribcage; on a longer torso, the same setting can sit cleanly at the waist.
Shoulder shape changes the strap’s route. Sloping or narrow shoulders can let smooth, narrow webbing migrate outward, effectively increasing the drop while walking. A fuller bust may lift the strap off the chest and push the bag forward; a modestly longer setting, or a flatter and broader strap, can restore a cleaner line without dropping the bag too low.
Also compare the bag with the wearer’s rise: the distance from crotch to natural waist. A long-rise petite person may have generous space between bust and hip, while a short-rise person can find a low bag meeting the upper thigh. Height alone does not predict either relationship.
Check the moving silhouette
Additionally, in ordinary movement, a workable setting remains convincing, showcasing the petite crossbody bag fit in daily use.
- Walk briskly; the bag should not repeatedly strike the hip or swing ahead of the body.
- Reach overhead and bend; the strap should stay seated without tightening across the bust or neck.
- Sit down; the bag should be easy to shift aside rather than pinning at the waist.
petite crossbody bag fit does not automatically mean the shortest strap setting.
Additionally, the right setting is the one that preserves proportion and stability on that particular body.
Check the hardware before changing the length
A stated drop can look promising yet fail once its hardware is counted. A sliding triglide offers near-continuous adjustment, while punched holes, ladder locks, and notched buckles move in fixed increments that may skip the useful setting. The buckle and keeper also consume strap length; on a compact frame, that bulk can sit uncomfortably close to the collarbone.
Chain straps need separate scrutiny. Removing a link changes length only in coarse steps, and a chain threaded through leather can lengthen slightly as the leather relaxes. Doubling a chain through a top ring creates a shorter shoulder carry but often changes the bag’s angle and access. The same concern for proportion seen in pens designed for smaller hands applies to clips: oversized swivel hooks can add weight, rattle against the bag, and make a small bag twist.
Inspect where the strap meets the bag
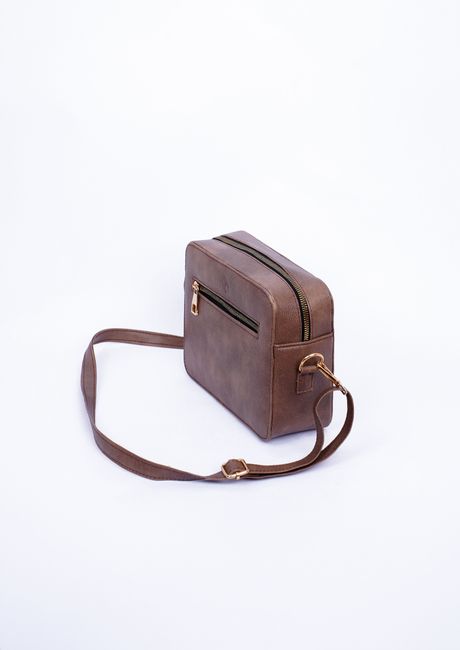
Top-corner attachments generally hold a bag closer and more upright. Side-gusset attachments add a longer visual and physical path, often making the bag project or roll outward even at the same measured strap length. Strap width matters too: a supple narrow strap drapes around the shoulder, whereas a wide, stiff strap can bridge it and effectively raise the bag.
A replacement strap can preserve the bag when its clip opening, metal gauge, finish, and load capacity suit the existing rings. For leather straps, a skilled repair professional can sometimes shorten from the attachment end; this is cleaner than adding holes, but may alter edge finishing and original proportions. Permanent cuts, drilled hardware, and removed chain links can affect warranty coverage, structural durability, and resale appeal.
A clip that barely fits an attachment ring can bind under movement and wear its finish. Test rotation and closure before relying on a replacement strap.
Test the setting with the bag loaded
-
Load everyday contents
Add the phone, keys, wallet, and other items that define what a small crossbody can realistically hold; an empty bag can sit deceptively high and still.
-
Start at the shorter end
Set the strap near the shortest plausible position, then lengthen only until the bag reaches its chosen landing zone.
-
Move normally
Walk briskly, reach forward, climb a few steps, and turn the torso. The bag should not bind at the shoulder, strike the thigh, or swing across the front.
-
Sit and stand
Check that the bag remains accessible without pressing uncomfortably into the ribs or shifting behind the hip when seated.
-
Record the working setup
Note the strap setting, full strap length if known, bag depth, loaded weight, and the clothing layer tested. These details make future comparisons far more reliable.
Petite Crossbody Fit: Common Questions
Does a bag labeled "petite" automatically fit a petite frame well?
Not necessarily. Torso length, shoulder slope, bust placement, bag depth, strap width, and what the bag carries all change where a bag settles. A “petite” label alone doesn’t account for any of those individual proportions.
Where should a crossbody bag ideally land on a petite frame?
It depends on the bag’s weight and the wearer’s proportions, but a high hip or waist position is often a balanced landing zone for medium-weight bags. Heavier loads generally benefit from a waist or high-hip target, while light bags allow more freedom to sit higher or lower.
Why does bag depth matter as much as strap length?
Depth holds the bag away from the torso, which effectively lengthens the path needed to keep its center at the same height. A deeper-than-expected bag can make an apparently correct strap setting wear lower and farther from the body than expected.
Should the strap be measured on an empty or loaded bag?
Loaded. An empty bag can sit deceptively high and still, so the setting should be tested with everyday contents like a phone, keys, and wallet, then checked while walking, sitting, and reaching.
What's the difference between total strap length and strap drop?
Total strap length is the end-to-end measurement at a given setting, including hardware like swivel clips and adjusters. Strap drop is the vertical distance from shoulder to bag top when worn, which describes the silhouette rather than the strap’s actual length.
Keep the shortest setting that still works
- A usable fit is proven under load and in motion, not by a product’s petite label or a flat measurement.
- Recording a successful setup turns future bag shopping into a comparable measurement exercise.
The useful adjustment point is the shortest comfortable setting that places the loaded bag in its intended zone while allowing ordinary walking, reaching, sitting, and turning. Extra length is only useful when clothing layers, bag depth, or another carry position genuinely requires it.




9 Comments
Really appreciate the point that “petite” isn’t a strap-length specification. I’m 5’1″ but have a longer torso and usually need the middle of the adjustment range, while my sister is taller and wears hers much shorter.
The seated test was the useful part for me. A setting that looked polished standing up kept bumping my thigh when I sat down or climbed stairs. After moving it up about an inch, the swing was much more controlled without putting the bag right under my arm.
The “whole carrying system” bit should be printed on every product page. A listed 120 cm strap length tells me almost nothing if they don’t say whether that includes the bag depth/attachment path or what the actual adjustment span is. Shopping online for this is weirdly harder than it needs to be.
Step 3 didn’t quite work for me because measuring the diagonal path with a tape gave me one number, but the bag sat almost 2 inches lower once I put my usual things in it.
Is that mostly bag depth, or does the strap stretch/load change more than I’m expecting? It’s a structured leather bag with fairly stiff hardware.
That difference is very plausible. The loaded bag can settle at the attachments, rotate slightly against the body, and sit farther out because of its depth; leather straps can also give a little under load. For your reference setting, use the loaded position rather than the tape-only number, then make sure the adjustment range extends a bit shorter and longer for different layers.
I had the same thing with a boxy leather bag. The empty-bag measurement was basically fantasy once I added a wallet, phone, keys, and water bottle 😅
I used your loaded motion test before taking a new crossbody on a city trip, and it saved me from a bad choice. With just the bag, the waist placement felt fine; with sunglasses case, charger, small umbrella, etc., it swung into my hip every time I turned.
I recorded the strap-hole setting and measured it over a light jacket and over my coat. Now I know I need roughly an extra 3 cm of usable range for winter rather than assuming the longest setting will magically work. Tiny detail, huge difference.
That is exactly the kind of repeatable check that makes future purchases easier. Recording the loaded setting plus your light- and heavy-layer measurements gives you a practical personal range, not just a generic “petite” recommendation. It also helps reveal whether a bag needs more strap length or simply a shallower profile.
Great tip about noting the hole/setting. I never remember which one worked after changing it for a coat, then spend five minutes readjusting before leaving the house.
I’m a little skeptical about the advice to preserve value with reversible changes. Some straps are absurdly long, and a removable knot or clip extender setup can look clunky on a nicer bag.
I tried the “stable upper-hip” placement, but on my bustier frame the strap keeps migrating outward toward the shoulder edge. Would shortening the strap solve that, or is the attachment geometry the real issue?